Addressable LEDs
I wanted to make my engineering lab space look more like a hacker lair and less like a hoarder situation. So I decided to buy some addressable LEDs this year.
So I contacted the guy who did this christmas light show, because I work with him and it seems he has some experience. I asked him:
"I want to light my lab space this year. I'd like to make it look like a hacker space from a movie, and maybe have it do different colors depending on the status of teams, builds, emails and other work related stuff. I'd like to do it all DIY style with no cloud service dependencies. I can use a raspberry pi, arduino, desktop linux box, etc. as the controller, and I'm happy to write the code in python/etc. I'm okay with wifi/bluetooth/zigbee/wired etc. but there are so many choices, I don't know where to start. I have a USB controlled power switch and some colored LED bulbs I've used in the past, but I'd like to find a system that works smoothly and reliably and is easy to repair/replace/upgrade. I'd like to start with some colored lighting to shine on some walls. What can you recommend to start?"
He replied:
"I have used WLED with ESP8266 dev boards and pixel strips. I had them controlling the lights outside, and then later brought them inside to use as lights under the kitchen cabinets. pixels come in 2 forms - strips and bullet nodes. the strips have adhesive backing and are great in places where you want the lights in the straight line (like under kitchen cabinets). strips are difficult to cut into custom lengths and still keep them waterproof so I don't use them outside any more. bullet nodes are what I use outside. WLED supports MQTT. that means you can control it with automation software like OpenHAB or Home Assistant (HA). something like this will work for you:"
"the Christmas lights outside use FPP on a Pi and BB as the main controllers, and then use xLights on a Mac to create the pixel control data. that's easier to use for elaborate setups like mine with thousands of pixels and light/audio sync. I use OpenHAB/MQTT to monitor and control the devices"
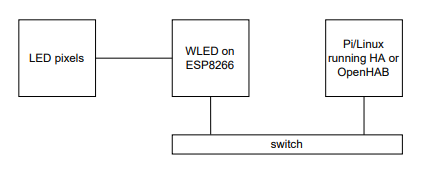
I had a Raspberry Pi 4 from an old project, and some arduinos, but in the end I wanted this to be controlled by a wired ethernet device as the brain, so I opted for the Pi.
Connecting Hardware on Vacation
I was heading on vacation so I started putting everything I thought I needed for this project in a box. When I got to the pi4 I realized I should set up all the software before I left.
I was surprised that NOOBs was no longer a thing since the last time I used the pi. The installer on linux is now very nice. I googled "raspberry pi without monitor" because I didn't want to have to find a monitor keybeard and mouse, but would have my laptop and my phone hotspot with me.
https://www.tomshardware.com/reviews/raspberry-pi-headless-setup-how-to,6028.html
Tom's Hardware did me well with this tutorial, except that the image shows it installing a 32-bit OS, and the raspberry Pi imager did me wrong by also making that the default. I have a Pi 4, and Tom's guide says you "can" use the 64-bit version. It really might be better to say you "should" use the 64-bit version, as I eventually had to reinstall the 64-bit version to get OpenCV to run. On the other hand, I guess it's good that they opt for the highest compatibilty OS as their default in the installer, because it gives the lowest risk for a new user. It installs quickly, no big deal.
The pi imager is really nice in adding a settings button that can put an ssh key on the ssd and also a wifi password. It makes it supre easy to give it the key of the current user on my laptop. That's brilliant.
It also let me enter my phone's hotspot password and the device showed up immediately under the .local domain. That's smooth like butter. Big improvement over having a monitor and mouse!
I headed to Cleveland.
I googled and found my first step should be to hook up the LEDs and light a single LED. Walk before run, right?
I started with this tutorial, using the simplest wiring diagram, because I had carefully selected a 5V string of LEDs.
https://learn.adafruit.com/neopixels-on-raspberry-pi?view=all
import board
import neopixel
pixels = neopixel.NeoPixel(board.D18, 30)
pixels[0] = (255, 0, 0)
That's pretty simple. I like to start with something like that.
I powered them from a phone charger and an old USB cable that I cut the wire off of and stripped with a screwdriver. I used some screw down terminals to hold them in place. The data and ground pin I connected to GPIO18 and ground on the PI by releasing the pins from the three pin connectors using the pointy tip of a multimeter probe. (I was on vacation, so I didn't have all my proper tools. I soldered it all up nicely when I got home.)
It was only a few minutes of copy and paste to get that going. I then wrote a quick LED light chaser loop and showed my kids. "Cool" they said, but clearly weren't too impressed.
Creating a Mock to test without Hardware
When I got home I had the pi in a box and wanted to keep working on the software side. I decided it would be great to use an emulator. I found this stack overflow question asking about mocking the adafruit-circuitpython-neopixel library, and thought that would be neat. It wasn't answered, but I had also seen a couple hackaday projects(link to another?) that would display stuff on the PC.
I set off to make an emulator that fakes out the adafruit-circuitpython-neopixel for use on linux. I don't think people normally do mocking, but I think it's a good idea.
Unfortunately the neopill project only works with a hardware serial port capture box (the blue pill). I decided to use only the back end of it. It didn't take long to get a mock working. First I found the adafruit neopixel python source code and made a copy. I then modified the output functions to print to the screen rather than write to GPIO.
The next step was to get the LED's displayed on the screen. I first set up the hackaday.io project and got the LED string configured and showing on the PC. This meant modifying this project to accept data from the adafruit library, rather than from the serial port.
If you run python test_mock_neopixel.py on the PC it'll display example LED sequences in a little window.
Also if you run python fire_led.py --mock on the PC, it'll display the LEDs of the actual raspberry pi code in a little window. This can be used for software debugging if you can't actually see the LEDs, or don't have the pi available.
Visual Art should be created Visually.
Krita
OpenCV
Stuff Usually Glossed Over
Run as Root at Boot
https://learn.sparkfun.com/tutorials/how-to-run-a-raspberry-pi-program-on-startup#method-3-systemd
https://serverfault.com/questions/806617/configuring-systemd-service-to-run-with-root-access
The raspberry pi needs to run this stuff at boot. There are several ways of doing this, and I tried several. But this application requires the script to run as root. The simplest solution was to use a systemd process.
messaging between server and raspberry pi.
I wanted my desktop machine to control this, so I needed to message with the PI. I wanted this to be secure, so I decided to use SSH for messaging.
I also decided to use just ssh and the filesystem to pass messages, rather than some other fancy protocol.
Save your SD card.
I know that writing to disk repeatedly will kill an SD card, so I decided to write to a ram disk. Googling this solution didn't give great answers. They said to put stuff in /run/user/1000/ but that stuff was getting deleted because that user is not a system user and not logged in.
So I moved it to /var/shm/ and found I was having the exact same problem.
I'd write the file there, but the LED's wouldn't light up the right color because the file wasn't there. Debugging this was no fun, because the program was running as a systemd process. I temporarily stopped the process and ran it via ssh to debug it. I added output messages in the cases to determine what state it was in. It was seeing the files that were written to SD did not exist.
Something was deleting them.
Systemd deleting stuff
I needed to edit this file TBD to prevent systemd from trying to "clean up" and deleting my files.
systemd restarting too fast.
It wasn't clear why this was happening at first. I rate limited to prevent it at startup.
todo: add link to stackoverflow
Watchdog
If you don't feed the watchdog by touching a file via ssh, the LED's will go into a special flashing mode indicating that there is no valid input.
tmux
I'm currently running the update process under tmux so it doesn't die when I shut down my laptop. This is easier to do than setting up another systemd process on my desktop. Eventually I should, but it makes it easier to debug just running in tmux.
wget in python can be done ten wrong ways that seem to work
https://stackoverflow.com/questions/35115513/python-bad-request-in-get-but-wget-and-curl-work
It's still not clear to me why I can't use requests to replace wget. The trouble with wget is that it works in the sunny day case, but when something goes wrong it can hang forever. I need something that will timeout gracefully.
I ended up using:
https://github.com/poleguy/fire_led/blob/master/check_calendar/check_calendar.py
response = urllib.request.urlopen(url, timeout=10.0)
data = response.read()      # a `bytes` object
working with dates
working with dates in python can be tricky.
TypeError: can't compare offset-naive and offset-aware datetimes
don't upload secrets to github
I suppose the url to my .ics file is not exactly a secret, but I don't want everyone to read it and get it blocked by microsoft or something dumb. But since I wanted it saved with my script, and I wanted a working script I had a bit of a problem.
Once you put it in the git repo it's not impossible to remove it. There are scripts to clean up your repo. But I had just started, so instead, I ran:
rm -rf ./git
And then started over with
git init
Calendar integration
Now controlling LED's is no fun if they aren't actually doing something meaningful. So besides lighting up my garage lab space to try to look like a movie hacker lair, I thought they should also warn me if I'm about to miss a meeting.
At first I was planning to scrape my status info from teams, but that got complicated. Specifically, I couldn't figure out how to easily intercept the calls that periodically read the calendar data. I think I'd have to develop something more advanced that Teams Green because I think I'd need a dev tools extension, not a regular chrome extension in order to intercept and read the teams data. Maybe another day.
But I determined that from outlook I can share a busy/free calendar to any email address as a link. This link lets you download a .ics file.
I then spent a bunch of time trying to figure out how to read the .ics file to determine if I'm busy or not. You'd think this would be easy, but no. The libraries for reading .ics in python are pleanty, but they are pretty naive. I went down a number of paths that produced incorrect results because they don't handle repeating events corectly.
The final solution works great though.
Parsing .ics files
https://stackoverflow.com/questions/3408097/parsing-files-ics-icalendar-using-python
This shouldn't be as hard as it is. The You really need to just use the recurring-ical-events package. The base icalendar package doesn't handle recurring events for you.
Unfortunately there aren't any good complete examples for recurring-ical-events. I always like to start from a complete working example, so to find a good example I had to search through their codebase. This is why FOSS software is great. I found what I wanted here.
The ics package, the vobject package, the icalevents package were dead ends neither provided an easy way to see if a meeting was about to start.
todo: add links to all the stackoverflow entries I used to get my solution working.
Now my LED's flash red and white two minutes before every meeting.
Final Result
Here's my repo with it all, including installation instructions:
https://github.com/poleguy/fire_led
Footnotes:
1
https://github.com/rogerdahl/ws2812b-neopixel-emulator
Fine for arduino. In cpp. Not great for python/raspberry pi.
2
git clone git@github.com:having11/NeoPixel-Emulator.git
https://www.hackster.io/gatoninja236/neopixel-emulator-with-python-f233c3
works okay. needs small change for pyglet 2.0
3
https://hackaday.io/project/179916-neopill
hardware based emulator.
4
https://github.com/marcmerlin/ArduinoOnPc-FastLED-GFX-LEDMatrix
This seems to be a full mock for many different arduino backends. But not for Raspberry Pi.
5
https://www.makeuseof.com/tag/emulate-raspberry-pi-pc/
This is a full "rpi on pc" emulation using QEMU. But does it do the hardware GPIO... uh... I think not.